读 SDWebImage 源码小记
Version: 4.2.0
流程
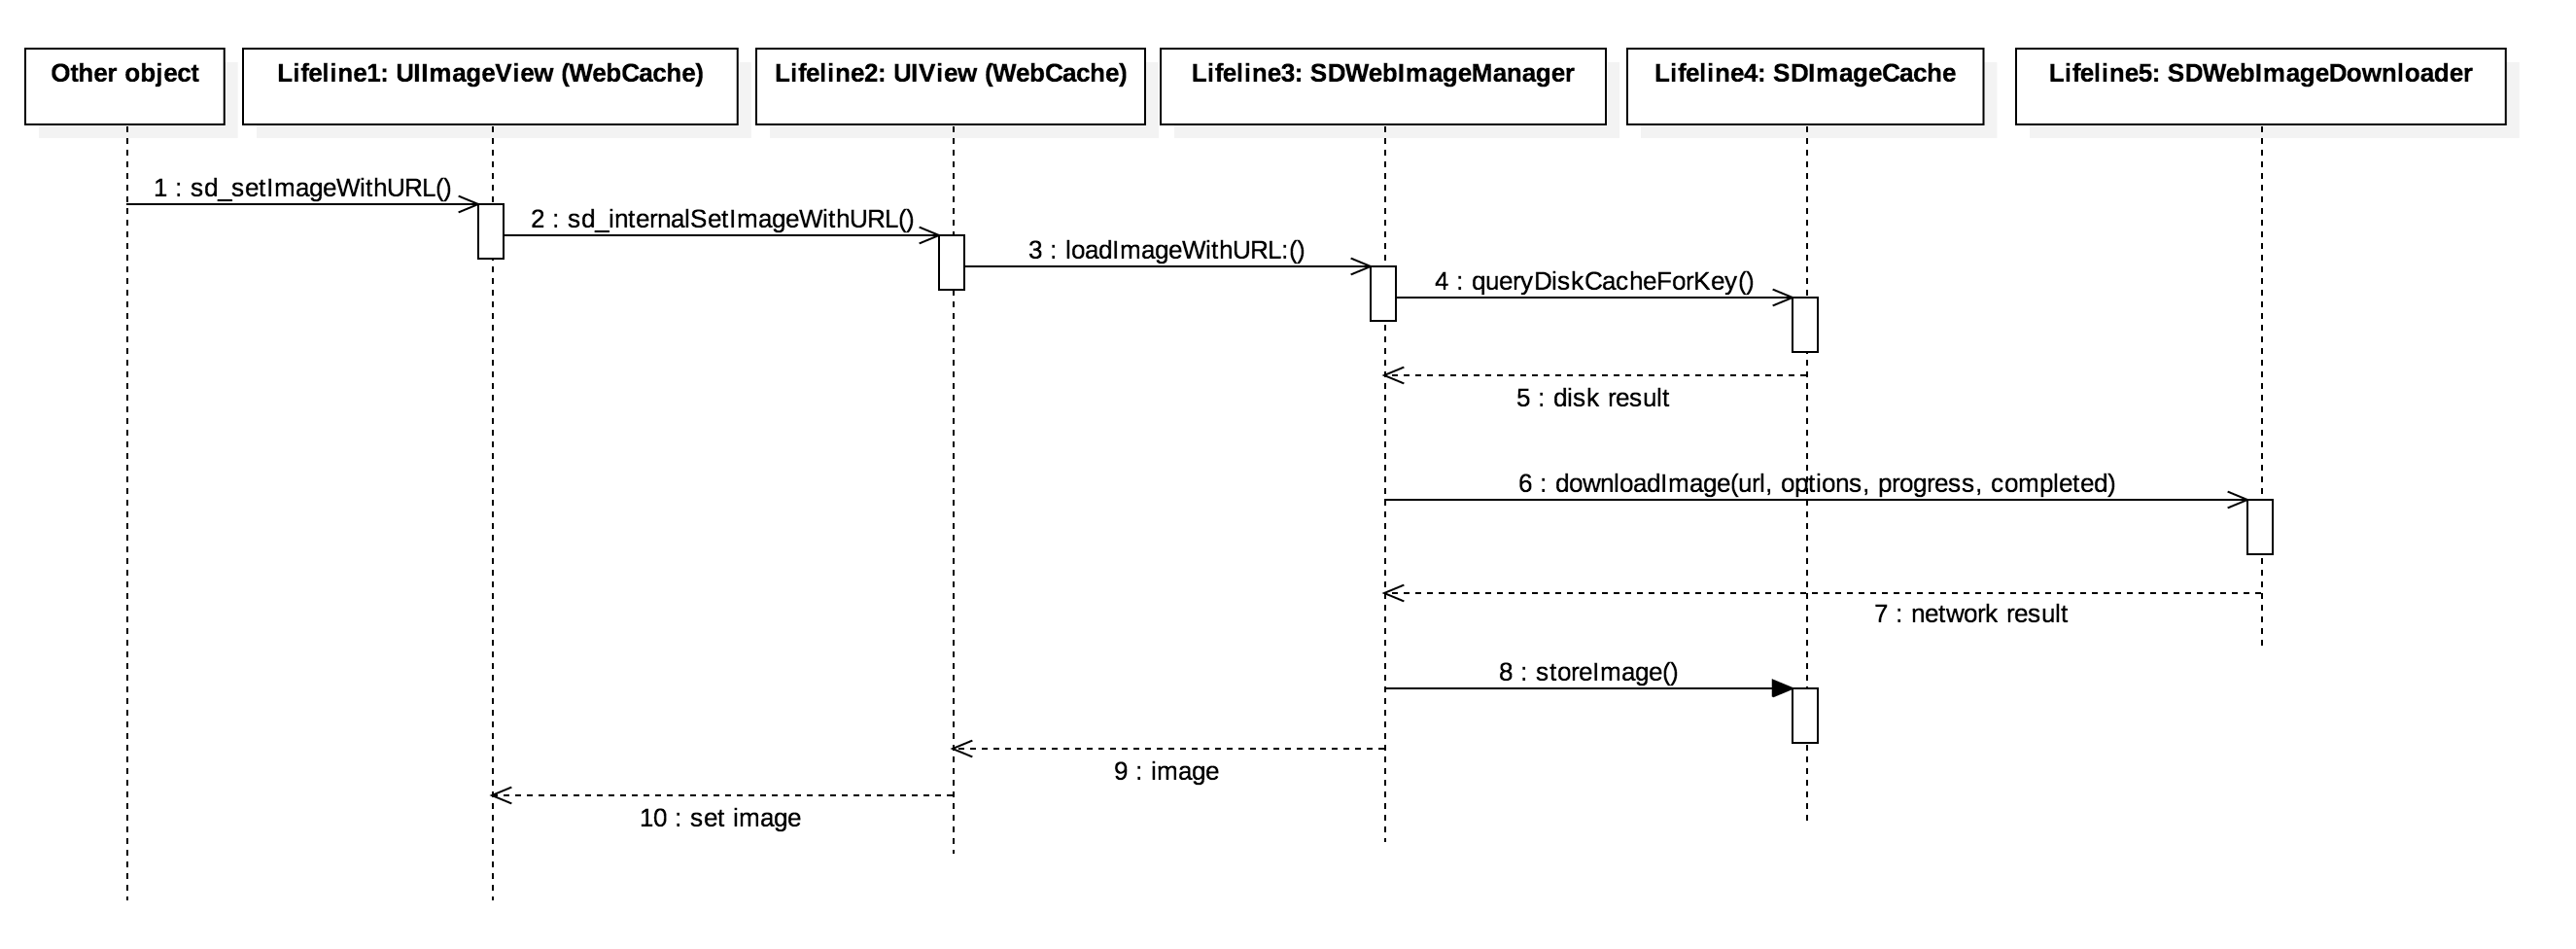
基本流程
- 通过对象 (eg:
UIImageView) 的Category(sd_setImageWithURL()) 作为入口 - 调用基类
UIView的Category(sd_internalSetImageWithURL()) - 调用管理类
SDWebImageManger的loadImageWithURL:()方法,由SDWebImageManger协调SDImageCache、SDWebImageDownloader - 调用缓存类
SDImageCache的queryDiskCacheForKey()先去检查有没缓存(内存+磁盘) - 有缓存,返回缓存图片
- 若没有,由
SDWebImageDownloader发起请求下载图片downloadImage(url, options, progress, completed) - 返回下载结果回调给
SDWebImageManger - 下载图片成功并用
SDImageCache的storeImage()缓存图片 - 返回图片给基类
UIView,缓存或者下载的 - 图片设置到对象上 (eg:
UIImageView)
主要文件
- 入口:
CategoryUIImageView+WebCacheUIButton+WebCacheUIView+WebCache- ……
- 缓存
SDImageCacheConfig:缓存配置SDImageCache:缓存管理
- 下载
SDWebImageDownloaderOperation:实际下载操作SDWebImageDownloader:下载管理
- 编码/解码
SDWebImageCodersManager: 编解码管理SDWebImageCoder:编解码协议SDWebImageImageIOCoder:PNG/JPEG/TIFF 编解码,解压缩,显示大图SDWebImageGIFCoder:GIF 编解码SDWebImageWebPCoder:WebP 编解码
- 工具
SDWebImageManager:协调SDImageCache、SDWebImageDownloaderSDWebImagePrefetcher:预下载图片
解压缩(Decompress)
解压缩指的是,将压缩过的图片(JPEG、PNG、WebP、APNG)解压成未压缩的位图。
加载图片流程
- 假设用
+[UIImage imageWithContentsOfFile:]加载图片,它会创建UIImage的一个引用,此时并不会发生解码 - 返回的
UIImage赋值给UIImageView - 隐式
CATransaction捕获到图层树(layer tree)的修改 - 在主线程
run loop的下一个循环时,Core Animation会提交这些隐式CATransaction,图片可能会创建一个copy。在copy过程中,可能会发生如下一些或者全部步骤:- 分配管理文件 IO、解压缩操作的内存缓冲区
- 文件数据从磁盘读取到内存中
- 压缩的图片数据解码成未压缩的位图格式,这通常是非常耗时的 CPU 操作
Core Animation将解压缩后的位图数据渲染到图层(layer)上
其中「流程4步骤3」中图片的解压缩是一个非常耗时的操作,而且默认发生在主线程中。当显示的图片过多时,容易导致性能问题。特别是滚动时,尤为突出。
因此我们可以将图片的解压缩放在后台线程,不堵塞主线程。这就需要提前在后台线程解压缩,之后将解压缩后的图片在主线程赋值给 UIImageView。
主要实现
1 | - (nullable UIImage *)sd_decompressedImageWithImage:(nullable UIImage *)image { |
对比了 YYWebImage、FLAnimatedImage 的解压缩代码,iOS 位图上下文支持的像素格式,以及 UIGraphicsBeginImageContextWithOptions 的讨论说明,最终的 CGContextRef CGBitmapContextCreate(void *data, size_t width, size_t height, size_t bitsPerComponent, size_t bytesPerRow, CGColorSpaceRef space, uint32_t bitmapInfo) 的传入参数应该如下:
1 | CGBitmapContextCreate(NULL, |
加载大图
当加载一张很大的图片时,如果直接加载到内存中,很容易超出 App 的最大内存预算,轻则 App 被系统 Kill,重则整个系统重启。详细参数见:iOS App 的最大内存预算
因此我们可以采用 Tiled rendering 的方式渲染图片,每次只加载图片的一小部分,最后再拼成一张图。详细可以看看 SDWebImageImageIOCoder.m 的实现或者苹果示例代码。
其他
主队列 vs 主线程(Main Queue vs. Main Thread)
1 |
|
这是 SDWebImage 的主线程判断代码,使代码一直在主线程上运行。
这里的主线程判断是用主队列进行判断,而不是主线程判断。为什么呢?
首先在 dispatch_sync 的文档讨论中有说到:
… As an optimization, this function invokes the block on the current thread when possible.
作为优化,dispatch_sync 有可能会在当前线程中调用 block。
假设你调用了如下代码,当然了,尽量不要在主线程调用任意同步操作(容易死锁😔)。
1 | // main queue environment |
dispatch_sync 分配的任务在 nonMainQueue 队列中调用,因为优化问题,nonMainQueue 队列有可能会在当前线程中调用,即主线程。
那主线程中会有 2 种情况,有可能是主队列,有可能是非主队列。
所以对于 UIKit 、需要主线程或者主队列的代码,用主队列判断会更安全。